Fast CGI Cache
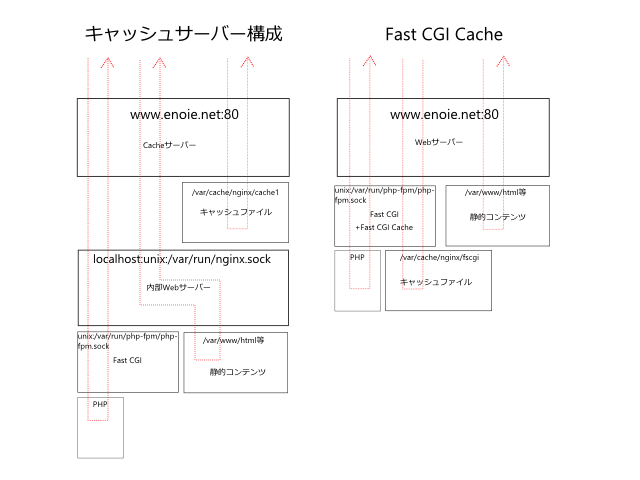
「Nginxを使ったもう一歩進んだWordPressチューニング」を見て知ったのだが、NginxにはFast CGI Cacheという機能がある。これは名前の通りCGIの処理結果をキャッシュするものである。現環境はServerディレクティブを2つ使って、1つをキャッシュサーバー、もう1つをインターナル・Webサーバとして設定していた。PHPの処理結果をキャッシュするのがそもそもの目的であるので、 Fast CGI Cacheを使用すれば、キャッシュサーバーの設定が不要になるなぁと思った。
さっそく試してみた。nginxの設定は下記のような感じである。この設定ファイルはnginx.confとは別にdefault.confとして作っていて、conf.dディレクトリに保存してnginx.confでインクルードしている。
# ドキュメントルート
root /var/www/html;
# Fast CGI Cacheの設定
fastcgi_cache_path /var/cache/nginx/fscgi levels=1:2 keys_zone=fscgi:10m inactive=10m;
fastcgi_cache_key "$scheme://$request_method$host$request_uri";

server {
    listen       :80 default;
    server_name  www.sfpgmr.net;

    # gzip圧縮を有効にする。
    gzip on;
    gzip_disable msie6;
    gzip_types text/css application/x-javascript text/html;
    access_log  /var/log/nginx/front.access.log  main;
    error_log /var/log/nginx/front.error.log ;

    location = /xmlrpc.php {deny all; access_log off; log_not_found off; }
    location = /robots.txt  { access_log off; log_not_found off; }
    location = /favicon.ico { access_log off; log_not_found off; }

    # ドキュメントルートの処理
    location / {
        try_files $uri $uri/ /index.php =404;
        index  index.html index.htm index.php;
        expires 30d;
    }

    # .で始まるファイルはdeny!
    location ~ /. {
        deny  all;
    }

    # imagesエイリアスの処理
    location /images/ {
        alias /var/www/images/;
        expires 1y;
    }

    # blogエイリアスの処理
    location /blog {
        alias /(Wordpressディレクトリ);
        try_files $uri $uri/ /index.php =404;
        index  index.php;
        if (!-e $request_filename) {
            rewrite ^/blog(.+)$ /blog/index.php?q=$1 last;
            break;
        }
        expires 30d;
    }

    set $do_not_cache 0;

    # toolsディレクトリはソースIPを絞り、利用を制限する。
    location /tools/ {
       allow (管理用のソースIP);
       deny all;
       log_not_found off;
       set $do_not_cache 1;
    }

    # POSTはキャッシュを使用しない。
    if ($request_method = POST) {
        set $do_not_cache 1;
    }

    # ログイン時はキャッシュを使用しない。
    if ($http_cookie ~ "(wordpress_loggedin|commentauthor)(.)") {
         set $do_not_cache 1;
#        set $proxy_cache_key "$2::$proxy_cache_key";
    }

    # /blog/エイリアスのphpファイルの処理
    location ~ ^/blog/.+.php$ {
        alias /(Wordpressディレクトリ);
        fastcgi_index  /blog/index.php;
        fastcgi_pass unix:/var/run/php-fpm/php-fpm.sock;
        fastcgi_split_path_info ^/blog(.+.php)(.*)$;
        fastcgi_param  SCRIPT_FILENAME  /(Wordpressディレクトリ)$fastcgi_script_name;
        fastcgi_intercept_errors on;
        fastcgi_cache   fscgi;
        fastcgi_cache_valid   200 302  1h;
        fastcgi_cache_bypass $do_not_cache;
        fastcgi_cache_valid   301      1d;
        fastcgi_cache_valid   any      1m;
        fastcgi_cache_min_uses  1;
        fastcgi_cache_use_stale error  timeout invalid_header http_500;

        include        fastcgi_params;
     }

    # /blog/エイリアス以外のphpファイルの処理
    location ~ ^.+.php$ {
        fastcgi_index  index.php;
        fastcgi_pass unix:/var/run/php-fpm/php-fpm.sock;
        fastcgi_param  SCRIPT_FILENAME  $document_root$fastcgi_script_name;
        fastcgi_intercept_errors on;
        fastcgi_cache   fscgi;
        fastcgi_cache_valid   200 302  1h;
        fastcgi_cache_bypass $do_not_cache;
        fastcgi_cache_valid   301      1d;
        fastcgi_cache_valid   any      1m;
        fastcgi_cache_min_uses  1;
        fastcgi_cache_use_stale error  timeout invalid_header http_500;

        include        fastcgi_params;
    }

    # Tumblr ディレクトリへのアクセスは node.jsに振る(node.jsは8080で駆動)
    location /tumblr/ {
        proxy_pass http://localhost:8080/;
    }


    #error_page  404              /404.html;

    # redirect server error pages to the static page /50x.html
    #
    error_page   500 502 503 504  /50x.html;
    location = /50x.html {
        root   /usr/share/nginx/html;
    }

}
設定方法はここを見ればだいたいわかった。だいたいキャッシュサーバーの設定とやり方は同じだ。しかしphpファイルをFastCGIに振る部分についてはもうちょっと簡素に書けそうに思うし、そもそもルールのディレクトリの適用がどのように行われるのかがまだ腑に落ちていない状態である。まだまだ改良の余地はあると思う。
通常のキャッシュとの性能比較
abツールを使って比較してみると、キャッシュサーバー構成のときよりもわずかにパフォーマンスが高くなっている。
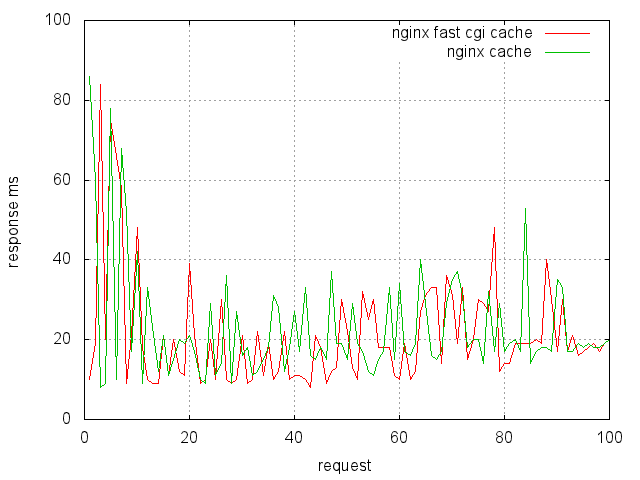
ということで、キャッシュサーバーを使う場合と比べてあまりパフォーマンス上の利点はない。けれど、使用メモリが50-100MBほど少なくなる。ServersMan@VPSのような少ないメモリのサーバーにとってはちょっとうれしい。
「Nginxを使ったもう一歩進んだWordPressチューニング」ではさらに、WP Super Cacheが作成する静的gipファイルを使ってさらに効率的に処理する方法が書いてある。ちょっと試してみたい気もするが、パフォーマンスアップはここまでで一段落でいいかな。
Wordpress 3.6
そもそもパフォーマンスチューニングをはじめたのは、Wordpress3.6へのアップグレードがきっかけ。アップグレード後やっぱりこのサイト遅いなぁ。。と気にしだしたのがはじまり。 アップグレードも特別目的があってやったわけではない。しかし今回のアップデートにはTwenty Thirteenテーマが新たに加わっていて、これにすごく惹かれるのですよ。テーマ変えようかなぁ。。でもかなりカスタマイズしているし、めんどうなんだよねぇ。。テーマの変更。。テストサイトも用意しないといけないし。。